 iPhone
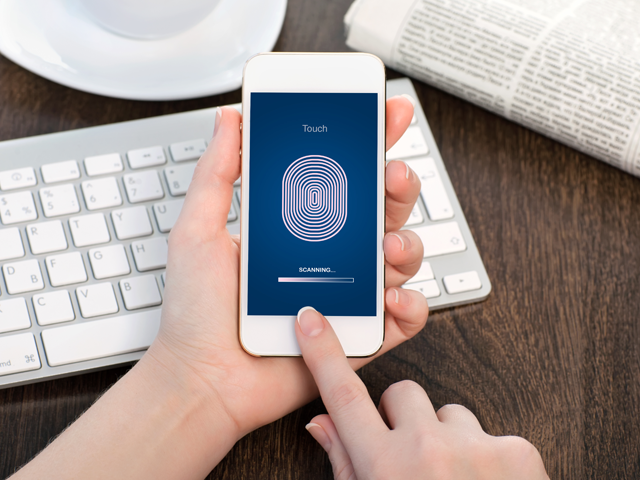
How many secrets do you think your iPhone can reveal to strangers? Even when it’s in your hands, placed on the table, or being charged from a laptop it can reveal quite a few—from personal correspondence and photos, to financial information and credentials. So how do you protect yourself? Well, you can follow our tips in order to maximize your iPhone security.
Keep in mind that doing everything we mention here will deprive your iPhone of some of its helpful features, but at the same time it will better protect your private data. You don’t have to follow all of the tips, so feel free to choose what you’re ready to sacrifice for the sake of security — it’s completely up to you.
10 tips on how to stop your #iPhone from revealing your secrets
Tweet
1.Use a strong password instead of a 4 digit code
The simplest and most efficient way to protect your data is to use a strong password instead of a simple 4 digit pin code for unlocking your iPhone. It’s a good idea to use a combination of letters, digits and symbols. It’s even better if the password is requested immediately after the lock screen, without any delay. As an extra option, you can also turn the “erase data” feature on, so the device will wipe everything from its memory after 10 failed passcode attempts. But keep in mind that all the data will be erased forever and you won’t be able to recover it, so it’s best not to forget your password.
How will it help? It will reduce the chances of a criminal being able to guess your password.
Where can you set these requirements? Go to “Settings” –> “Passcode” (or “Touch ID and passcode”) –> “Require passcode: immediately”; “Simple passcode: off”.
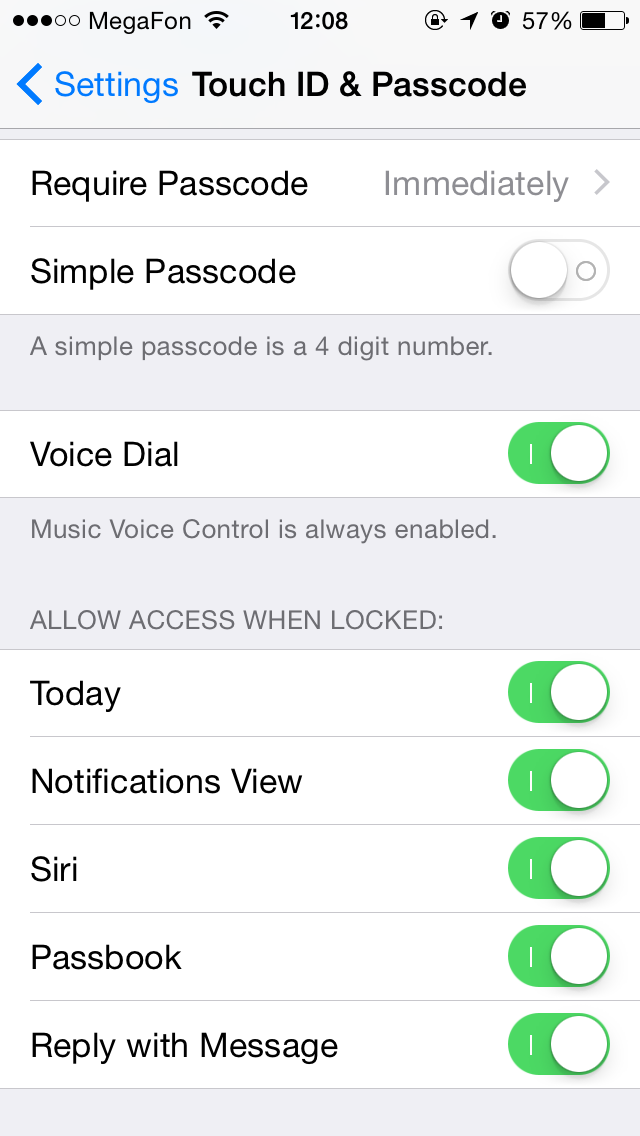 Use a strong password instead of 4 digit passcode and get rid of all notifications on a lock screen.
2.Turn off lock screen notifications
Any password, even the strongest one, won’t prevent your data from being revealed if it appears on a lock screen. Messages, emails, and other information in your apps can contain some sensitive data like confirmation codes, private appointments, financial data, etc. The less your iPhone shows on a lock screen, the safer your data is.
How will it help? It won’t let strangers oversee information showing up on a lock screen.
Where can you set these requirements? Go to “Settings” –> “Passcode” (or “Touch ID and passcode”) –> “Allow access when locked” section.
3.Turn on two-step verification for Apple ID and iCloud
One lock is good, but two is better. That’s why it’s highly recommended that you set up two-step verification whenever it’s available for Apple ID and iCloud. When you set up two-step verification, you register one or more trusted devices (devices you control) that can receive 4-digit verification codes using either SMS or the Find My iPhone service. Then, any time you sign in to manage your Apple ID, sign in to the iCloud, or make an iTunes, iBooks, or App Store purchase from a new device, you’ll need to verify your identity by entering both your password and a 4-digit verification code.
How will it help? It will prevent your Apple account from being used by somebody that is not authorized.
Where can you set these requirements? Go to https://appleid.apple.com –> “Manage your Apple ID” –> “Password and Security” –> “Two-Step Verification”.
4. Disable Siri on a lock screen
Siri is a great Phone feature, but sometimes this nice personal assistant can give away some information that you would prefer to keep confidential. It’s not necessary to turn it off completely, but you will be much more secure if you prevent it from activating from a lock screen or on a “Hey Siri” voice command. Don’t forget: Siri can communicate with anyone, not just with an owner of the device it works on.
How will it help? It will eliminate the possibility of data extraction from the smartphone using Siri.
Where can you set these requirements? Go to “Settings” –> “Passcode” (or “Touch ID and passcode”) –> “Allow access when locked” section –> “Siri: off” and “Settings” –> “General” –> “Siri” –> “Allow “Hey Siri”: off”.
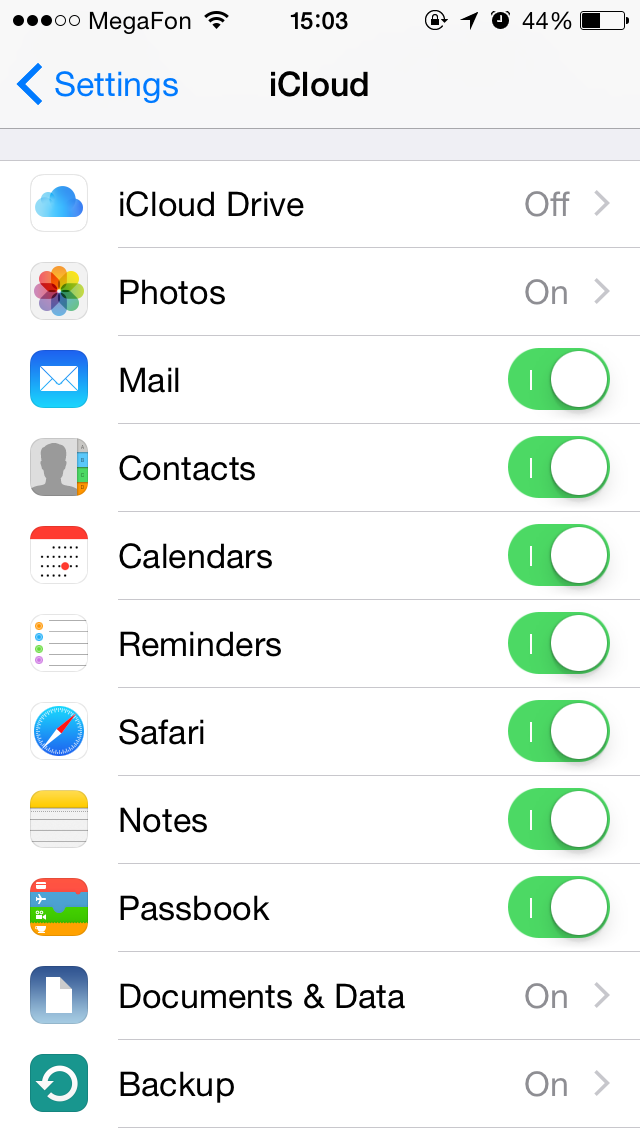 In your iCloud settings you can turn off automatic synchronization for any type of data.
5. Turn off automatic sync to iCloud
As you might know, a lot of pictures from a recent leak were originally stored on Apple’s iCloud servers, which drove many celebs crazy. They thought that deleting a photo from a phone would solve the problem, but it doesn’t: after syncing to the “cloud” the data stays there, even if you get rid of it locally. Actually it happens with almost any kind of data if we are talking about iPhones and iCloud: messages, notes, contacts, documents — everything syncs automatically unless you turn it off. And that’s what we’d recommend, especially if you have just a couple of Apple devices and don’t need to sync them on a daily basis.
How will it help? It will reduce the risk of compromising your data while it’s on the iCloud servers, or if you loose one of your Apple devices.
Where can you set these requirements? Go to “Settings” –> “iCloud”.
6. Discard automatic WiFi connections to known networks
iPhones have a very good feature which allows you to automatically connect to known WiFi hotspots without your permission. On the one hand, this is a very useful option, as you don’t need to do anything to switch from mobile Internet to local WiFi. But on the other hand, there’s a chance that a cybercriminal will establish his own fake wireless network with the same name as a trusted public hotspot. In this scenario you might not even recognize that your iPhone is working within the malicious WiFi network, giving away all of your data to the scammer. That’s why we recommend that you either be very aware of every WiFi hotspot you are in, or turn this option off.
How will it help? It will reduce a risk of connecting to malicious wireless network.
Where can you set these requirements? Go to “Settings” –> “Wi-Fi” –> “Ask to join networks: on”.
7. Get used to VPN
We speak about VPN quite often on this blog. A Virtual Private Network is a must-have tool which can bring extra security to everyone who uses an iPhone in different wireless networks, including unknown ones. Some VPN services are free of charge, some aren’t, but several dollars a week is more than a fair price for keeping your data protected.
How will it help? It will encrypt all incoming and outgoing Internet traffic making it useless to intercept and analyze.
Where can you set these requirements? Go to “Settings” –> “General” –> “VPN” –> “Add VPN Configuration…”.
P.S.: All of the information that you have to enter will be given to you by your VPN provider.
8. Turn off cookies in your browsers
Cookies are small files which almost any website generates and leaves on your device. They may contain some information about you, your computer or smartphone, and your preferences. It helps websites keep you logged in, or to show you some relevant content including ads, but in some cases they may be very helpful to cybercriminals as they can contain credentials and other sensitive data. To be honest, turning off cookies might bring you more stress than relief, but it helps your data by being more secure. Plus, some discomfort is not the biggest price you have to pay for data protection.
How will it help? It will reduce the risk of unauthorized use of your login data and some other private information stored in cookie files.
Where can you set these requirements? For Safari: Go to “Settings” –> “Safari” –> “Privacy & Security” section –> “Do Not Track: on”, “Block Cookies: Always Block”; For third party browsers: see similar browser settings.
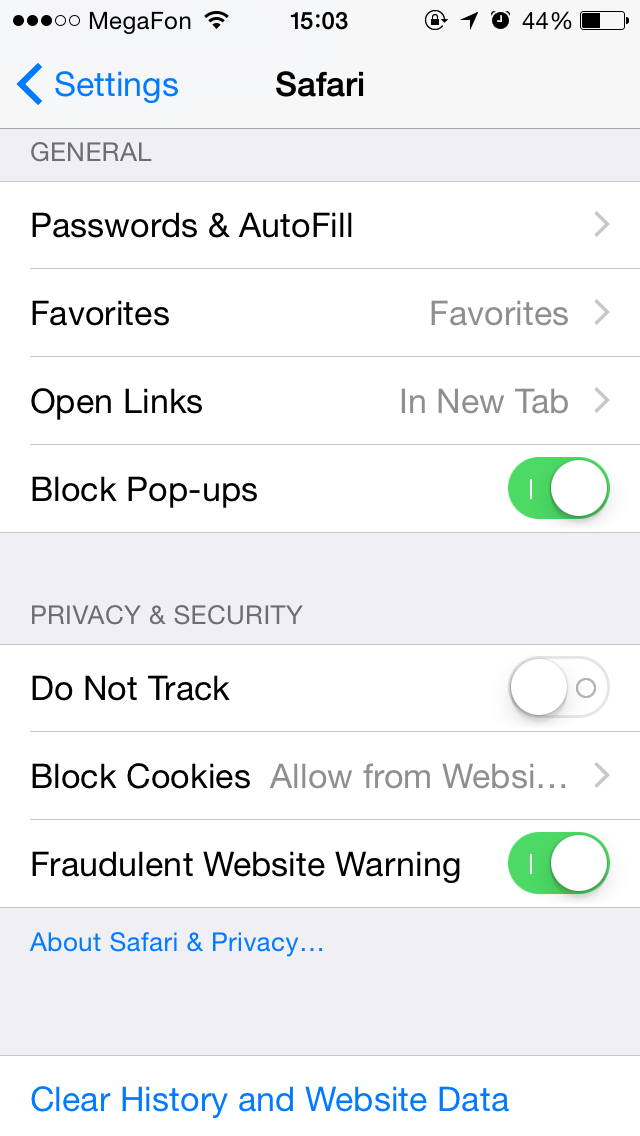 In Safari settings you can turn off cookies and the AutoFill option.
9. Turn off the AutoFill option in your browsers
The same goes for the AutoFill option: if somebody gets your iPhone, then chances are this person will be able to log in as you on a number of sites. You don’t want this to happen, do you? Then switch it off! Again, you’ll experience some inconveniences, but it’s worth it.
How will it help? It will reduce the risk of someone logging into websites with your credentials when your iPhone is stolen or given to somebody.
Where can you set these requirements? For Safari: Go to “Settings” –> “Safari” –> “General” section –> “Passwords & AutoFill”; For third party browsers: see similar browser settings.
10. Don’t let apps access your contacts, photos, messages and other private data
This tip is quite extreme, but if you already followed every single recommendation we gave, then you might as well go ahead with the last one. In iOS 8 there’s a significant number of features and data types that almost any app can access: from GPS, to contacts, to messages. For example, if you install a third party keyboard you must give it full access to everything you are typing in order for you to be able to use it. If this sounds quite non-secure to you, then you have no choice but to go to “Settings” and prevent all these corporation-driven apps from accessing your data. After that you probably won’t be able to use some of the apps that you have, but that’s the way it is.
How will it help? At least it will give you some confidence in knowing that large companies like Google or Facebook won’t get any information about where you are, what you are doing and what kind of pizza you like.
Where can you set these requirements? Go to “Settings” –> “Privacy”.

 Tips
Tips